Blog's Detail
Finishing Activities Post-Superstructure Grey Work For Constructing A House Or Villa
In the previous blog, we have described grey structure activities. Here we are going to take a look at activities that are required to finish your dream villa construction. It is important to note that some of these activities and sequences may vary depending on the architectural design or project requirements due to their geographical location or materials and resource availability. Some other factors, such as the engagement of your architects, engineers, contractors and other professionals, may also play a role in these activities sequencing. Let’s start looking at these basic elements:
Electrical Conducting and Plumbing Piping Installation
As mentioned, if a Grey Structure contractor has yet to perform these activities, the electrician must finish installing all required conduits throughout the villa according to the electrical layout plan. It is better to review with the client or house owner if any changes are required before these are buried under plasterwork.
Plaster Work
Before starting plaster work, it is recommended to perform a thorough inspection to ensure no cracks, holes, or imperfections. If any are found, they should be repaired using appropriate materials, and the surface should be cleaned. Generally, plaster is created with a mixed cement mortar of a 1:6 ratio according to the required consistency. Depending on the quality of block work, a base coat of plaster and a finish coat of plaster may be added to achieve the desired texture. The best result would be obtained if the level and alignment were properly done on the surface.
Initial Interior Paint Work
After completing the plasterwork, we must ensure the surface is even and dust free. To achieve this, apply rubbing paper on the surface. Then, apply a coat of primer to the walls and ceilings. The primer seals the surface, enhances paint adhesion and helps achieve an even color. Professional painters should be used to achieve the best quality, as they may use rollers, brushes, or even sprayers depending on the surface area to be painted. Once the primer is dried, wall putty is further applied to achieve a smooth surface before a base coat of required paint is applied at this stage.
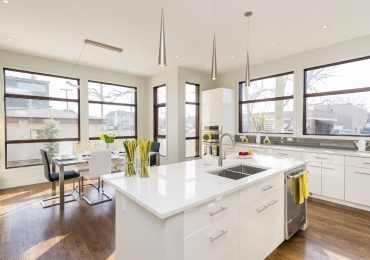
Bathrooms and Store Tiling Work
Depending on the interior design, bathroom tiling is generally performed, followed by false ceiling work (if any). Surfaces are then inspected for any unevenness or cracks. The filling is applied to remedy these, leaving a smooth surface if necessary. Depending on the chosen material (Tile/Marble/Granite), a skilled worker will install the tiles (marble or granite according to the design). A suitable mortar or adhesive is applied on the back of the tile, ensuring proper coverage. The tiles or slabs are then installed, maintaining consistent spacing and alignments. Once the adhesive has been set, grouting fills the gaps between the tiles or slab. Generally, the gap ranges from 2mm-4mm, depending on the manufacturer’s recommendation.
False Ceiling Work
False ceilings, drop ceilings, or suspended ceilings refer to a secondary ceiling installed below the main structural roof ceiling as per the interior design requirements. These ceilings are installed to create an aesthetic look and help conceal other work not originally concealed in the concrete work. False ceilings are typically constructed using gypsum boards, PoP materials, PVC or MDF. Typically, installation requires some anchoring in the structure and the installation of supporting members. These panels are then installed on the supporting members. False ceilings in locations other than bathrooms and house stores are generally created before tiling or marble installation on floors and for other parts after tiling is completed.
Internal Flooring Work
Once the false ceiling work is completed, the entire floor area is cleaned and inspected for any unevenness or cracks. If necessary, filling is applied to create a smooth and even surface. Depending on the chosen material (Tile/Marble/Granite), a skilled worker installs the tiles, marble or granite according to the design. A suitable mortar or adhesive is applied on the back of the tile, marble or granite, ensuring proper coverage. The tile or slab is installed, maintaining consistent spacing and alignments. Once the adhesive has been set, grouting fills the gaps between the tiles or slab. Generally, the gap ranges from 2mm-4mm, depending on the manufacturer’s recommendation.
Doors and Windows Installation
Carpenters will then install doors and windows of either Aluminum, PVC or Wood. These are installed in the designated openings and are positioned securely with the appropriate fixing mechanism to hold them in place. Weatherproofing is also performed to avoid any water seepage.
Cabinetry and Wardrobes
A specialized carpenter or fabricator fabricates the cabinetry and wardrobes based on the interior design. These materials vary significantly in terms of quality and price. Generally, wood, PVC or MDF is used. Leveling, plumbing, and secure attachment are key aspects besides surface quality. These elements can only be verified by skilled and professional carpenters or fabricators. Necessary adjustments may also need to be conducted to achieve the proper alignment and functionality.
Locks and associated Fixtures Installations
Once the doors are installed, locksmiths or carpenters will install locks and handles by making sure that these are properly aligned and securely fitted for smooth operation and effective security. These locks and handles vary significantly and depend on the selection criteria provided by the homeowner and interior designer.
Bathroom and Kitchen Fixtures Installation
A plumbing team will install bathroom and kitchen fixtures per the approved design and specifications. Fixtures such as faucets, showerheads, and taps are installed per the approved design. These are connected to the plumbing system. Depending on the requirements, mirrors and cabinets may also be installed. These are installed securely, ensuring stability and proper alignment.
Electrical Fixtures Installation
Light fixtures, including ceiling lights, false ceiling lights, LED strips, wall lights, pendant lights, and chandeliers, are installed by an electrician as per the approved design. These are securely attached to the walls or ceilings with proper electrical connections. Other components, such as ceiling fans and air conditioning systems, are also being installed at this stage. Further, switches and sockets will also be installed at this stage, and their connections will be provided to the installed components.
Interior paint final coating and polishing
When all prior finishing work is completed, a final coat of paint is applied to the wall. The door and windows are polished as per the selected theme. This is done to smooth the general premise of the project, ensuring that it meets the required ambiance of the project. Painting and cladding are performed with the selected material. Society bylaws must be followed in some cases, and prior approval is required for these materials. These include paint color, stone type and color, and brick or siding. Weather-protected coats, possibly consisting of multiple coats, are applied to achieve a certain desired aesthetic.
Driveway and Walkways Construction
Driveways and walkways are constructed depending on the approved drawings and layouts. Ceramic tiles, porcelain tiles, marble, granite and stone are commonly used materials. These also vary in sizing and design.
At this stage, plants, trees, shrubs, and other elements enhance the outdoor or inner uncovered space. Other elements, such as creating lawns and flower beds and installing irrigation systems, may be part of the scope.
Curtains and Blinds Installation
Depending on the requirement and design, these components will be installed after completing all fixtures installation. Once all the finishing work is completed, thoroughly cleaning the entire constructed house or villa is carried out. This includes removing any construction debris and unused materials. All the area is then thoroughly cleaned.
Final Inspection
Before offering concerned society inspectors or relevant agencies, a final villa inspection must ensure that all elements comply with the requirements and meet the approved design. Once the concerned team carries out the inspection, they will generally issue a certification of occupancy indicating that the house or villa is ready for occupation and that tenants can now be moved in.
I have briefly covered all elements and activities required to convert a grey structure into a livable space. In the next blog, I will explain different materials used in B, A, A+ or Superior quality of construction. The selection of this material will significantly depend on your requirement and budget.
To get your dream villa built on the prime location of DHA Karachi and Bahria Town Karachi, Contact us to get high-quality construction services in Karachi, Pakistan
UHCONST
© uhconst- All rights reserved